
Notifications
Clear all
cPanel
1
Posts
1
Users
0
Reactions
39
Views
Topic starter
Hey guys, I have an easy guide on blocking certain IP addresses, it can't be easier than blocking the IP address using the ".htaccess" file. This ".htaccess" is located on your web-local server.
When you want to block a certain IP address from accessing your website, it can't be easier.
What you will need in order to block certain IP addresses from accessing your website.
- cPanel.
- File/Folder Access (using cPanel).
- The IP address you wish to block.
If you're hosting your website on all major web hosting providers, you will find that you will have access to cPanel right after you log in.
1. Log in to cPanel
On your web server (this could be 123reg, GoDaddy, Hostgator, or whatever your web host is, 99% of the time you will and should see your cPanel)

2. Locate File Manager on your cPanel
Scroll down the page, and you should find that the file manager will be within the location of your files on your website hosting service (cPanel)

3. Locate your folder and ".htaccess" file on your server.
I have blurred out any secure folders and files for security reasons, but as you can see, I have located all SEO basics on our web host and also located the ".htaccess" file.
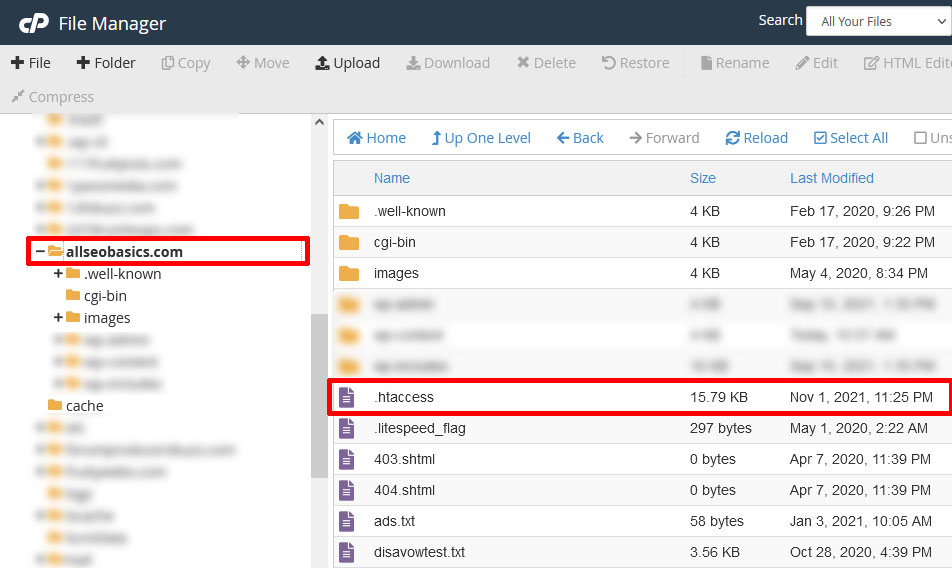
You may find that you might be missing or have no ".htaccess" file, in this case, you will need to create one. To create a htaccess file, go to the main parents (root) folder of your website.
In this case, select the file at the top left-hand side of your file manager. (Highlighted with a red square).

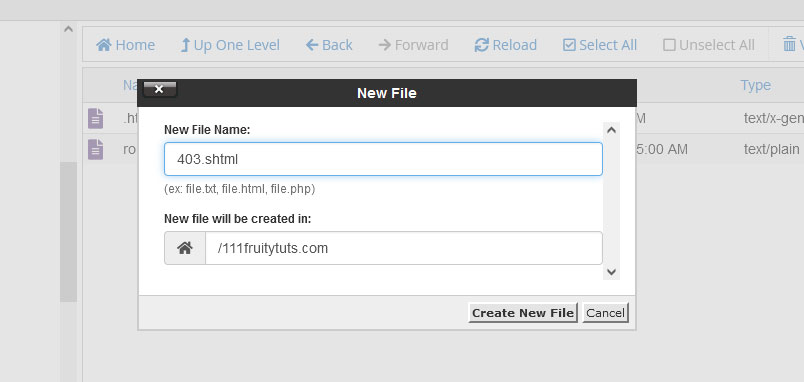
You will then need to type ".htaccess", you can copy the text from below.

When you type in ".htaccess" you should then select your location below, I have used 111fruityttus.com as a test domain, then click on the "create new file" button.
")
Now that you have your ".htaccess" or have located your existing ".htaccess". You can smoothly move to part 4.
4. Create a file or a path for blocked users to be sent to.
So now using the same style to create another file on the same location this time this will be a blank file, this is where all blocked IP addresses will be sent to if they're blocked.
-
Click on Create a new file
-
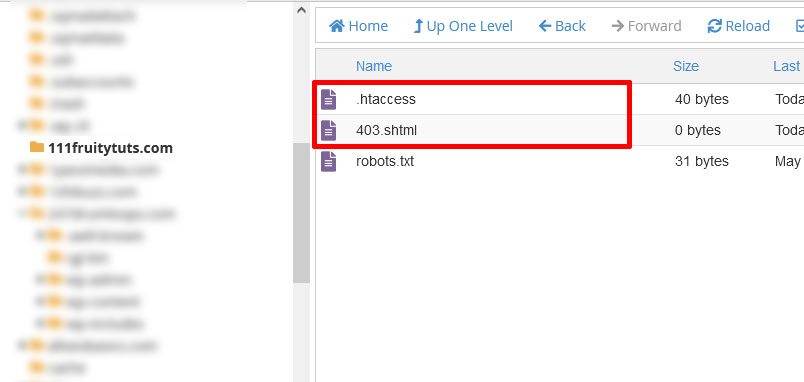
Input the test file name as "403.shtml"
403.shtml
Once you make the "403.shtml" file, you should see it on your server as shown below.
Now, the 403.shtml page will simply stay blank, meaning any blocked IP addresses will see a blank page and have no further access to other locations from here.
5. Editing ".htaccess" to redirect blocked users to 403.shtml page
So now that you have our 403.shtml page where all blocked users will stay in 403 access denied URL prison, now you will need to trigger this action by setting up the right code in ".httacces".
Let me show you how to edit the ".htaccess" now.
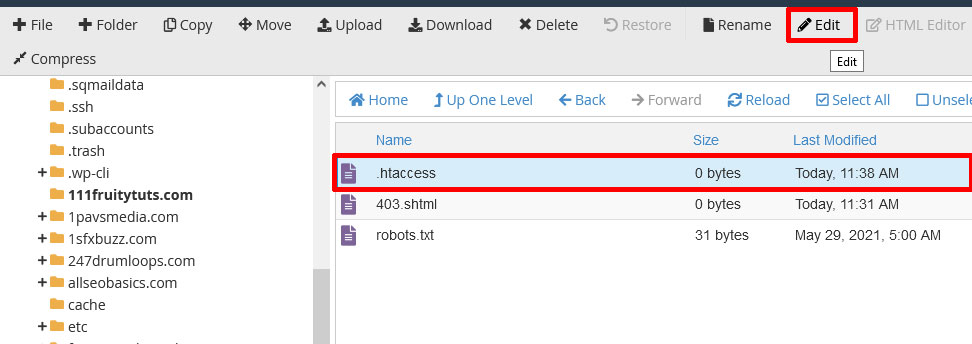
Select ".htaccess" and click on edit at the top (pencil icon before the text edit)
 edit htaccess file[/caption]
The code you will need to add to ".htaccess" is
<Files 403.shtml> order allow, deny allow from all </Files>
This simply tells the server, to hold on tight, now you will need to send all blocked users to this location "403.shtml".
 Now, as you can see above, this is the main trigger code which will redirect all blocked users to your BLANK Page (page with nothing on it) location.
Now let's jump to the last step 6 of adding the IP address you wish to block
6. Adding IP Addresses to .htaccess and blocking any unwanted IPs from accessing your website.
So now you will need to add the IP addresses that you wish to block, so let's say you wish to block 3 IP addresses from accessing our website, these are.
- 148.72.153.211
- 46.118.239.91
- 216.244.66.232
All 3 IP addresses have been spoofing around my server and trying to access or inject files.
Of course, this is just an example of really-bad IP addresses, you guys will probably have different IP addresses you wish to block.
So to block these, you will need to add these to your ".htaccess" file.
The code that you will need to add are shown below.
allow from all
(add your deny ip addresses below here, shown below)
deny from 148.72.153.211
deny from 46.118.239.91
deny from 216.244.66.232
With my already previous 403 redirect code, it should look something like this below
<Files 403.shtml> order allow, deny allow from all </Files> deny from 148.72.153.211 deny from 46.118.239.91 deny from 216.244.66.232

Now, we're telling your web server to allow All incoming IP addresses accessing your website and your files, but you will need to make sure that all these stated and denied IP addresses are blocked.
If they are blocked, then your web server will simply send these blocked IP addresses to 403.shtml location, which is a dead end with a blank page.
Now if you wish to be creative you can edit your "403.shtml" page and add text saying "Sorry, nice try, your IP has been permanently blocked from our server"
And the blocked user will see a blank page with your text.
Simple as that.
You have now successfully created a ".htaccess" file that will block any IP addresses from accessing your website. Redirect them to a dead-end file you have created and show them a blank page.
[Optional] Bonus ".htaccess" codes you can add for extra security.
If you wish to add extra security, you can also follow these step I have outlined below.
Now you can add 2 more .htaccess codes to your .htaccess file for more security. These codes will be added to the top of your .htaccess file.
1. Denying and stopping all access to "hidden and private" files
Redirect-Match 403 /\..*$
This code will simply prevent any hidden files, .htaccess and .htpasswd to be opened
2. Deny access to any folders or indexes on your website
Options -Indexes
This code will stop any hackers or anyone trying to retrieve the index of your file and subfolders on your web server. It's a step you can take to stop any intruders.
So now your .htaccess file will look something like this below
Redirect Match 403 /\..*$ options -Indexes <Files 403.shtml> order allow, deny allow from all </Files> deny from 148.72.153.211 deny from 46.118.239.91 deny from 216.244.66.232
Congratulations on successfully securing your website with the ".htaccess" file!
Don't forget to leave us a comment below! Best of luck, ALL SEO Basics!
This topic was modified 1 month ago 3 times by Pavel Horvath
Posted : 20/04/2025 1:25 pm
